17 Animations
Animations are a powerful way to visualize changes in data over time – to illustrate trends, patterns, and dynamics that might not be immediately apparent in static maps. They can also be used to create engaging visualizations that capture the viewer’s attention or just to break the monotony of static maps, for example, by comparing different locations.
In tmap, animations are created by stitching together a series of static maps into a single animated image. This is done with two types of functions:
-
tm_animate()andtm_animate_fast(), which create the animation from a tmap object -
tmap_animation(), which saves the animation to files in formats such as GIF and MP4
17.1 Creating animations
Let’s create some animations using the slo_regions_ts dataset, which contains various measures of Slovenian regions over time.
The basis for our animations is a tmap object that contains the data and the way we want to visualize it.
tm = tm_shape(slo_regions_ts) +
  tm_polygons("gdppercap")
To make it animated, we can use the tm_animate() or tm_animate_fast() functions and specify the variable that we want to animate by, in this case, time (Figure 17.1). The difference between the two functions is that tm_animate() renders the animation at 2 frames per second (specified by the fps argument), while tm_animate_fast() renders it at 24 frames per second. The former is more suitable for smaller datasets and cases where we want to allow the viewer to read the values on the map, while the latter is more suitable for larger datasets and cases where we want to create a smooth, cinematic animation.
tm +
  tm_animate(frame = "time")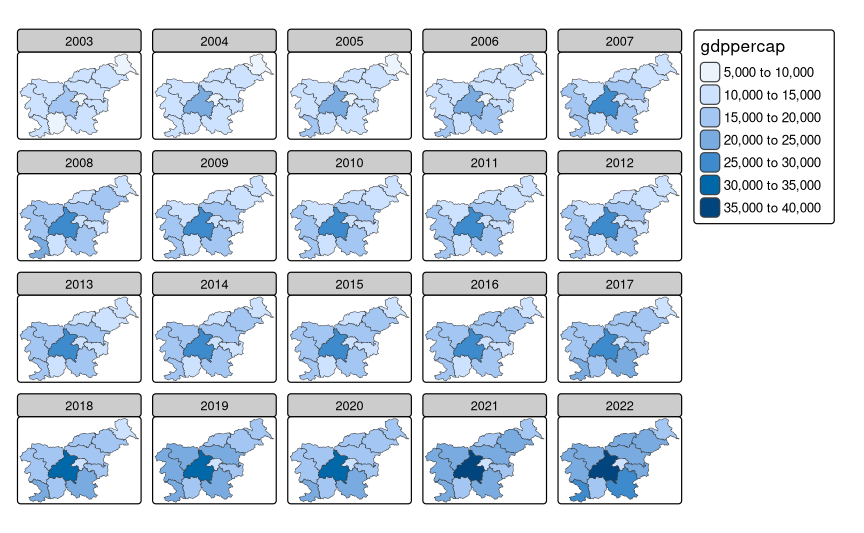
tm_animate().
Two main additional arguments for the animate functions are fps (frames per second) and play (playback mode). The first one controls the speed of the animation, while the second one controls how the animation is played back: either "loop" (default), which plays the animation in a loop, "once", which plays the animation only once and then stops, or "pingpong", which plays the animation back and forth (Figure 17.2).
tm +
  tm_animate_fast(frame = "time", fps = 5, play = "pingpong")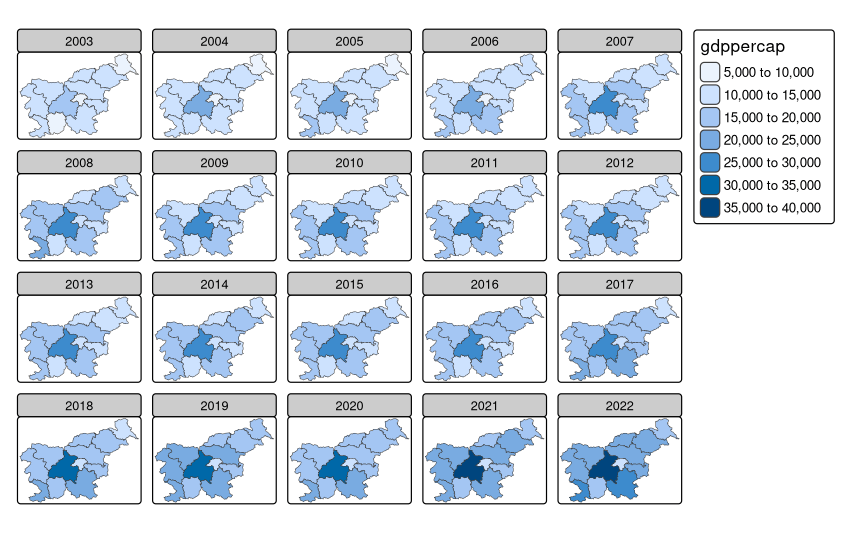
Animations can also be created from raster data, such as satellite imagery or climate data. Figure 17.3 shows an example of an animation of the average temperature in Slovenia over monthly time steps. First, the raster data is defined, and its scale is set to the continuous one. Next, we define the animation using tm_animate(). Finally, we add the borders of Slovenian regions to the map to provide context for the animation.
library(terra)
slo_tavg = rast("data/slovenia/slo_tavg.tif")
slo_regions = read_sf("data/slovenia/slo_regions.gpkg")
tm_shape(slo_tavg) +
  tm_raster(col.scale = tm_scale_continuous(),
            col.free = FALSE) +
  tm_animate(fps = 6) +
  tm_shape(slo_regions) +
  tm_borders()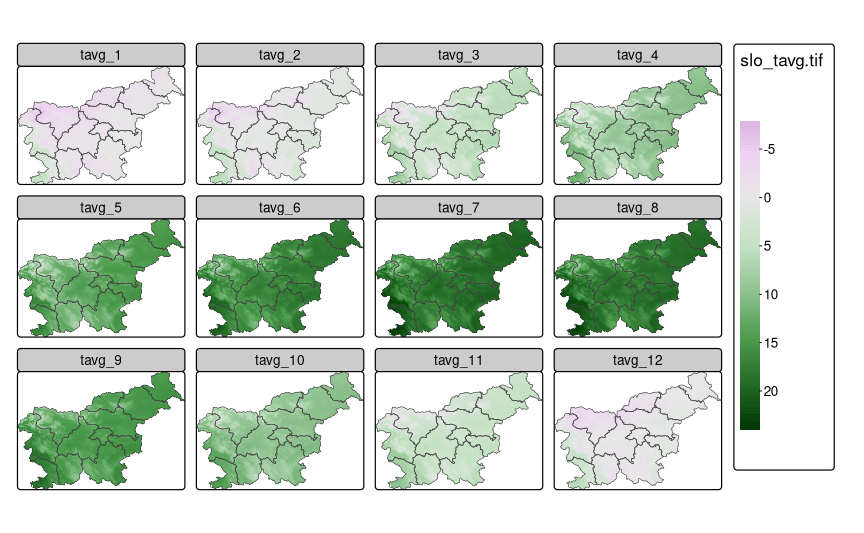
17.2 Combining animations with facets
If you read the previous chapters, you may see the similarity between the tm_animate() and tm_facets() functions, which create a series of static maps based on the values of a variable. The main difference is that tm_animate() creates an animation – one frame after another, while tm_facets() creates a grid of static maps, where each map corresponds to a value of the variable. However, we can also combine the two functions to create animations of facets.
Figure 17.4 shows an example of an animation of GDP per capita in Slovenian regions over time, faceted by region group. To create it, we first facet the tmap object by the region_group variable using tm_facets(), and then we animate it by the time variable using tm_animate().
tm +
  tm_facets(by = "region_group", nrow = 2) +
  tm_animate(frame = "time")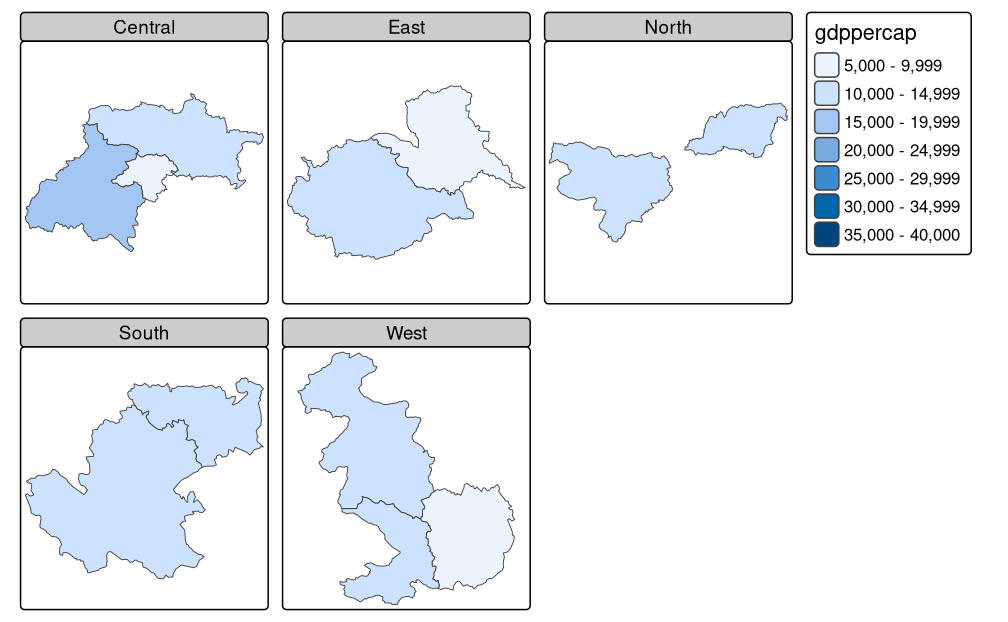
It is important to note that each layer group can have at most one tm_facets() and at most one tm_animate().
17.3 Saving animations
The tm_animate() and tm_animate_fast() functions create a tmap object that contains the animation and shows it. Now, to save the animation, we can use the tmap_animation() function. It takes the animation object as the first argument and the file name as the second argument – the extension of the file name determines the format of the saved animation. We may save the animation in either graphical format (GIF) or video format (including MP4).
tma1 = tm +
  tm_animate_fast(frame = "time")
tmap_animation(tma1, "tma1.gif")
# or
# tmap_animation(tma1, "tma1.mp4")
Additionally, we can customize the output of the animation with various arguments, such as width, height, dpi, asp, and scale (similarly to tmap_save() as shown in Chapter 4). Moreover, if the animation is saved in a video format, we can also specify various additional arguments, such as codec from the av package1.
Check the documentation of the
av::av_encode_video()function for more details.↩︎